Introduction:
In the age of smartphone photography, iPhones have emerged as powerful tools for capturing memorable moments. However, taking a great photo is only half the battle – editing plays a pivotal role in turning good pictures into breathtaking works of art. Whether you’re a seasoned photographer or a casual snap-happy enthusiast, this comprehensive guide will walk you through the best way to edit photos on your iPhone.
1. Leveraging Native Editing Tools
The first step to masterful photo editing is to explore the built-in features of your iPhone. iOS Editing Magic: Dive into the array of tools offered by iOS, including exposure adjustments, cropping, and filters. With easy-to-use sliders and controls, you can enhance colors, sharpen details, and achieve the perfect balance in your images.
2. Exploring Third-Party Editing Apps
Taking your editing game a step further, you can explore a multitude of third-party apps designed to maximize your creativity. VSCO: A World of Filters: VSCO offers an impressive array of filters and advanced editing tools. Experiment with various presets to give your photos a unique aesthetic.
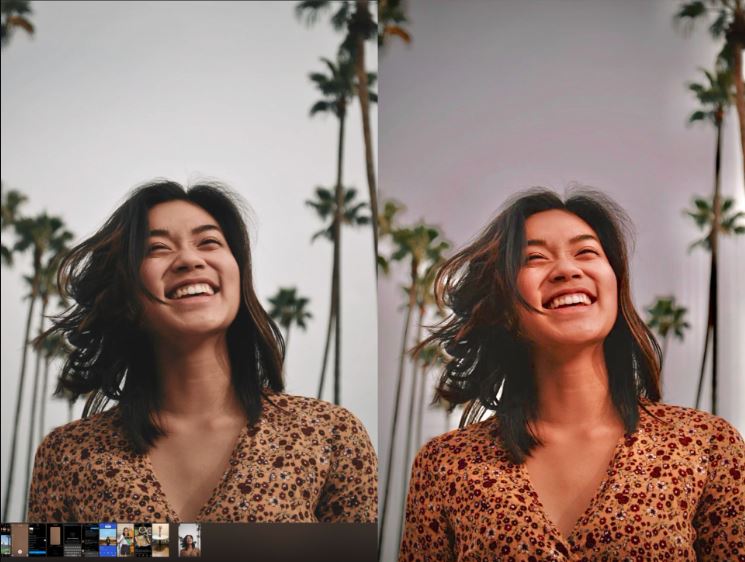
3. Harnessing the Power of AI
Artificial Intelligence is revolutionizing the photo editing landscape. AI-Powered Enhancements: Apps like Adobe Lightroom and Snapseed leverage AI to analyze your images and suggest improvements. From auto-adjusting exposure to removing unwanted elements, these tools simplify the editing process.
4. Perfecting Portrait Mode
The iPhone’s Portrait Mode is a game-changer for capturing stunning portraits. Creating Depth: Learn how to effectively use depth-of-field and bokeh effects to make your subject stand out against a beautifully blurred background.
5. Fine-Tuning Colors and Exposure
Color balance and exposure are critical aspects of editing. Vibrance and Saturation: Discover how to adjust vibrance and saturation to make colors pop without overdoing it. Explore exposure adjustments to ensure your photos are well-lit and balanced.
6. Bringing Life to Landscapes
Landscape photography requires specialized techniques. Sweeping Landscapes: Learn to enhance skies, emphasize natural features, and utilize the rule of thirds for captivating compositions.
7. Playing with Textures and Filters
Filters and textures can add a unique touch to your photos. Vintage Vibes: Experiment with vintage filters to give your photos a nostalgic feel. Layer textures for a tactile element that brings your images to life.
8. Mastering Black and White Photography
Monochrome photography is an art form in itself. Monochromatic Marvels: Discover how to create powerful black and white images by manipulating contrast, shadows, and highlights.
9. Editing for Social Media
Tailoring your edits for various platforms is essential. Instagram-Ready Edits: Explore the best practices for editing photos specifically for Instagram, considering dimensions, color schemes, and style.
10. Exploring Advanced Techniques
Advanced techniques can take your editing skills to new heights. Double Exposure Delight: Combine multiple images for a double exposure effect that evokes emotion and creativity.
11. Effective Use of Presets
Presets can save time and maintain consistency in your editing. Custom Presets: Learn how to create and use custom presets to apply specific edits across multiple photos.
12. Managing Noise and Grain
Low light conditions can introduce noise and grain into your photos. Noise Reduction: Discover techniques to minimize noise and grain while retaining image sharpness.
13. Retouching and Spot Removal
Blemishes and imperfections can be easily corrected. Spotless Edits: Master the art of retouching to eliminate distractions and create flawless portraits.
14. Blending and Layering
Blending and layering techniques are invaluable for composite images. Creative Composites: Explore the world of blending modes, layer masks, and opacity adjustments for artistic compositions.
15. Optimizing for Print
Editing for print requires attention to detail. Print-Ready Perfection: Learn how to adjust resolution, color profiles, and sharpening to ensure your images look stunning in print.
Also Read: Boost Your Rankings: How WP Fastest Cache Impacts SEO for Blogs
FAQs
Q: Can I edit RAW photos on my iPhone?
A: Yes, various apps like Lightroom and Snapseed support RAW editing for maximum flexibility.
Q: Are third-party editing apps safe to use?
A: Stick to reputable apps from trusted sources to ensure your data’s security.
Q: What’s the best way to learn advanced editing techniques?
A: Online tutorials, courses, and practice can help you master advanced editing skills.
Q: Can I revert my edits to the original photo?
A: Yes, most editing apps allow you to undo or revert changes at any time.
Q: How can I achieve a consistent editing style?
A: Create and save custom presets to apply a consistent style to your photos.
Q: Do I need to pay for advanced editing apps?
A: While many apps offer free features, investing in premium versions can unlock powerful tools.
Conclusion
Unlocking the potential of your iPhone’s photo editing capabilities is a journey worth embarking on. By combining native tools, third-party apps, and advanced techniques, you can elevate your photography skills and create captivating visuals. Whether you’re an amateur or a seasoned pro, these tips will help you master the art of editing and transform your iPhone photos into true masterpieces.